 |
| How to Format Your Computer or Hard Drive in Windows |
Formatting deletes all the data on a drive, checks the drive for errors, and prepares it for use. Traditional, magnetic-platter hard drives as well as solid-state drives can be formatted. Formatting destroys data and can take hours to complete, but it is a good option when you have a new or inherited drive that is not properly formatted, a drive overrun by malware or other software problems, or a drive in need of a fresh start before a Windows installation. Back up important files on the disk before you format it.
Formatting a Hard Drive Within Windows
To format an internal or external hard drive to use for backup or additional storage, the drive needs to be partitioned. Partitioning divides your drive into sections, but you can choose to simply have one partition (a single section encompassing the entire drive).
1. Click Start.
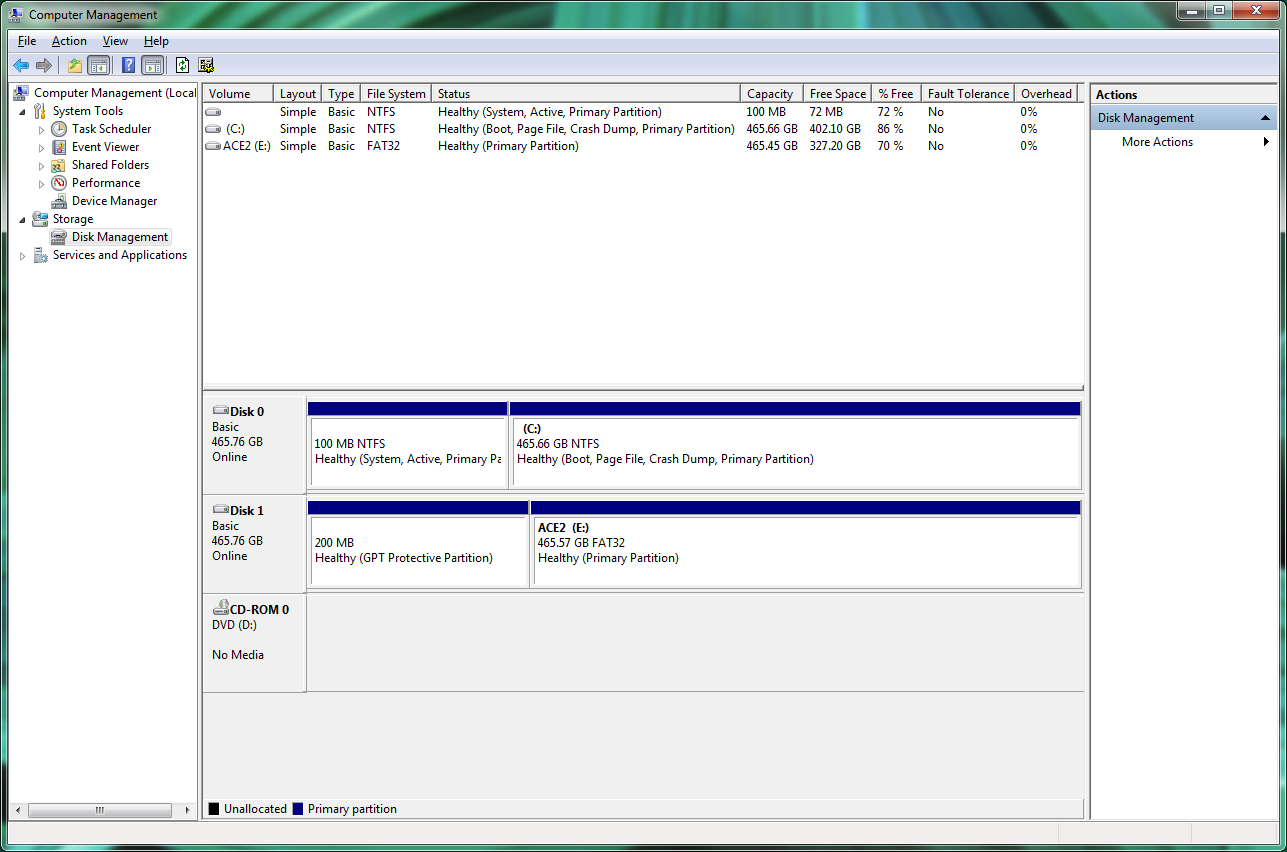
2. Right-click Computer, then click Manage. The "Computer Management" window will open.
3. In the left pane, click Disk Management (under Storage). If your disk is not initialized (as is sometimes the case with brand-new drives), you’ll be prompted to initialize it. If your disk is 2TB or more in size, select GPT; otherwise, stick with MBR.
A list of all connected disk drives is displayed in the center. Unpartitioned drives appear with solid black bars and the label "Unallocated." Partitioned drives appear with solid blue bars and a drive letter.
If your drive isn't partitioned, follow these instructions to partition it. Otherwise, skip down to the next section.
1. Right-click the black bar or the unallocated white space below it and select New Simple Volume… In this case, "Volume" is another term for "partition".
2. Click Next. To create a single, whole-drive partition, make sure the "Simple volume size in MB" value is the same as the "Maximum disk space in MB" value. Click Next.
3. Assign a drive letter of your choice. Click Next.
4. Select Format this volume. For File System, choose NTFS if you’ll be using the drive only with Windows machines. If you will be sharing the information on the drive with Macs, choose exFAT. Keep Allocation unit size at Default. Choose a name for the partition under Volume label. Do not select Perform a quick format or Enable file and folder compression. Click Next.
5. Confirm your selections and click Finish.
If your drive is already partitioned, follow these instructions.
1. Right-click the blue bar or the white space below it and select Format.
2. Choose a name for the partition under Volume label. For File System, choose NTFS if you’ll be using this drive only with Windows machines. If you will be sharing the information on this drive with Macs, choose exFAT. Keep Allocation unit size at Default. Do not select Perform a quick format or Enable file and folder compression. Click OK.
3. Confirm your choices.
Formatting for a Fresh Windows Installation
If you are formatting your primary hard drive with the intention of reinstalling Windows or restoring your PC to its factory-fresh state, you’ll need the restore disc(s) that came with your computer. If your computer manufacturer did not include restore media or you’ve misplaced it, contact the manufacturer directly for a replacement. You may also be able to create your own restore disc(s) or reinstall Windows from a factory-created partition on your hard drive; consult your computer’s documentation for details.
1. Insert your Windows installation disc or restore disc into your disc drive and restart your computer. Boot your PC from the Windows disc. For instructions on booting to your recovery partition, review your system documentation.
2a. If you are using a manufacturer’s factory restore disc or hard-drive recovery partition, follow the prompts to initiate the restoration process. Unless stated otherwise, your drive’s primary partition will be formatted and returned to its factory-fresh state.
2b. If you are using a Windows 7 or Vista installation disc, select your language, accept the Windows license terms, and select Custom (advanced) when prompted.
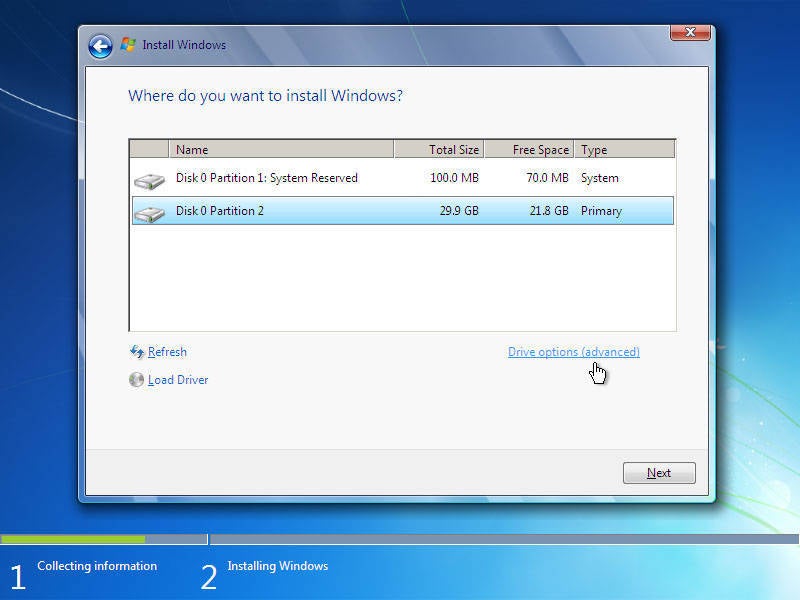
3. Delete any partitions you want to remove by selecting them, clicking Drive options (advanced), and clicking Delete. Create new partitions by selecting unallocated space, clicking Drive options (advanced), and clicking New.
4. Select Format after creating your partition(s). After formatting is complete, click Next to start the Windows installation. Windows may prompt you to accept the creation of a small, system-reserved partition--accept it.
What Formatting Doesn’t Do
Formatting doesn’t securely erase the contents of a hard drive. With freely available and easy-to-use tools, anyone can successfully recover data from a formatted drive.
Culled from pcworld.com


No comments:
Post a Comment